
Use Siri to Configure Your ASUS Router - Part 1

Why do this?
When traveling, there are times that I'd like to be able to access my home network. Luckily, my router has a feature to enable VPN, but as an added security measure, I'd like to be able to turn VPN on and off as needed. ASUS does allow for some IFTTT and Alexa integrations, but configuring the VPN setting is not one of the configuration items exposed. In this guide, I'll walk you through the process of capturing the changes made by the browser during the setting change, saving that to a bash script, using triggerCMD to run the command remotely, and executing the trigger using iOS shortcuts with Siri.
This will be a four part series.
Part 1 - Capture the commands
Part 2 - Setup Linux and Create Scripts
Part 3 - Install and Configure TriggerCMD
Part 4 - Configure iOS Shortcuts and use Siri
The Setup
-
An Asus RT-AX58U router with firmware version 3.0.0.4.384.
- Similar Asus routers should work (and possibly non-asus routers. But I've only been able to verify with this setup.
-
An instance of CentOS, Ubuntu, or Raspbian (or any OS that can install an RPM or DEB package.) This will be deployed in Part 2.
We are going to make the desired change in Chrome, and using a nifty "copy as cURL" feature, we will be able to capture that change as a cURL command.
We will need to capture four events.
- Login
- Enable VPN
- Disable VPN
- Logout
Capture the Commands
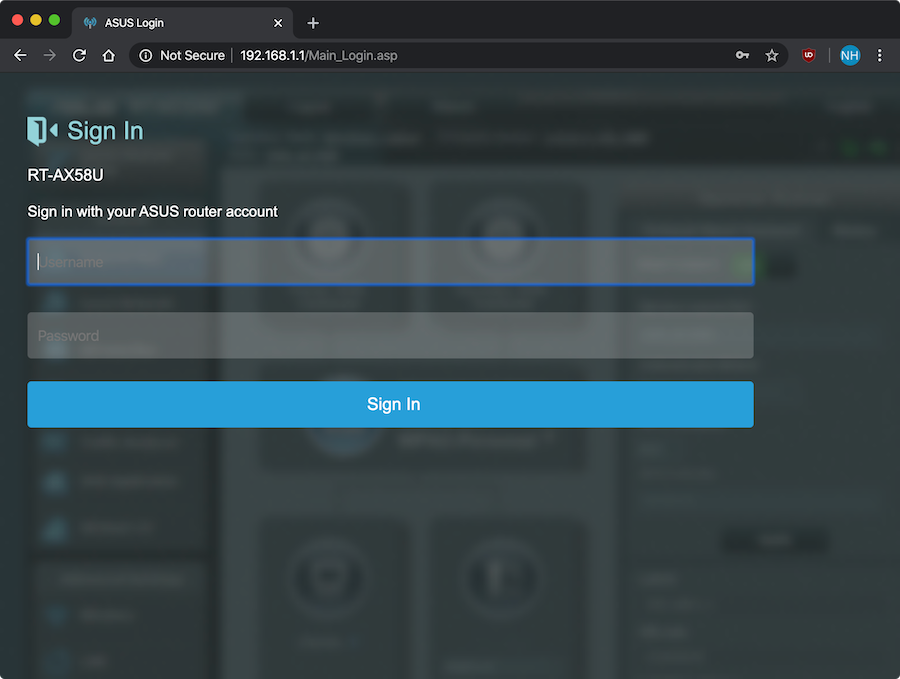
Step 01: Capture the ASUS Router Login
Open Chrome, and navigate to your ASUS router's admin page. (this is typically 192.168.0.1 or 192.168.1.1). If you are unsure, try both and if these are unsuccessful, check your default gateway.
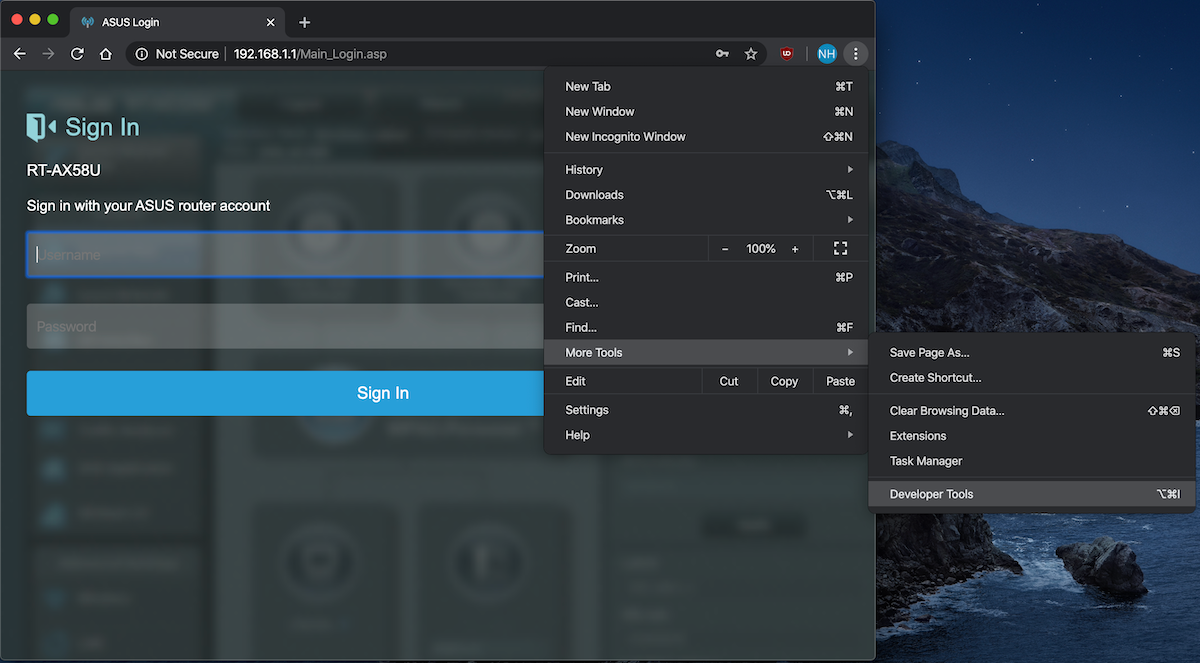
Before logging in, click on the vertical ellipses > More Tools > Developer Tools.
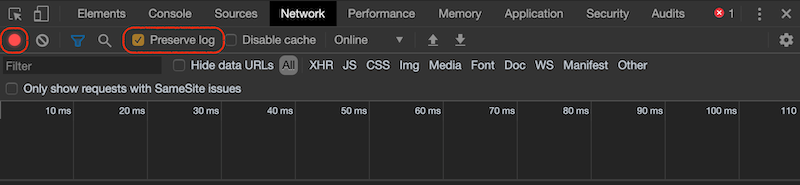
Click on Network and ensure that the session is being recorded (red circle) and Preserve Logs is checked.
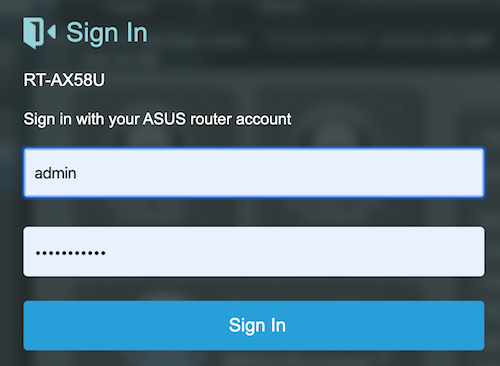
Go back to the router login page and login.
Shortly after logging in, you should see a lot of movement taking place in the Developer Tools view.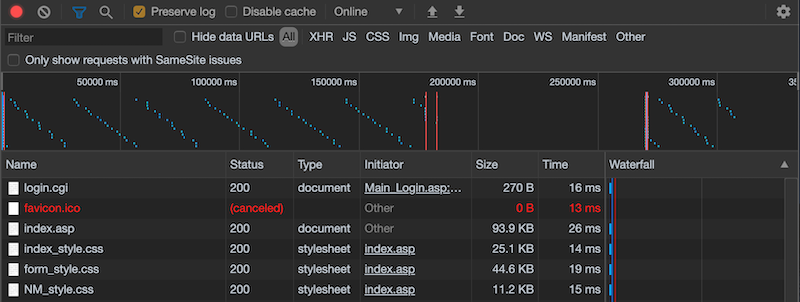
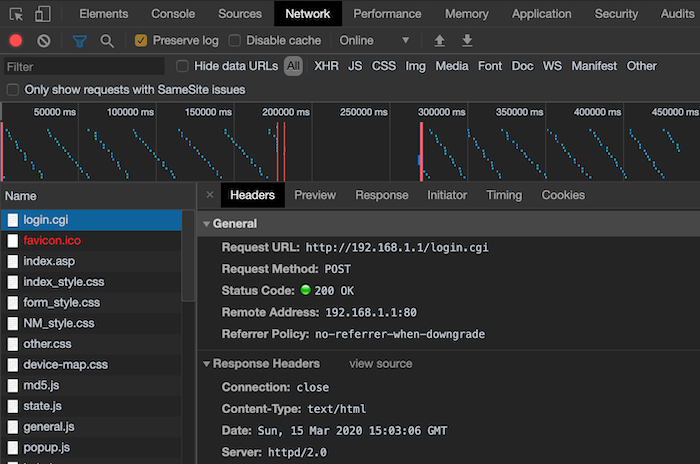
Click on the login.cgi object in the list. You will see basic info about this request, which includes the requested URL, request method (POST), and the response.
Here is the magical part, were going to convert this to a cURL command. Right click on the login.cgi object, select copy > copy as cURL.
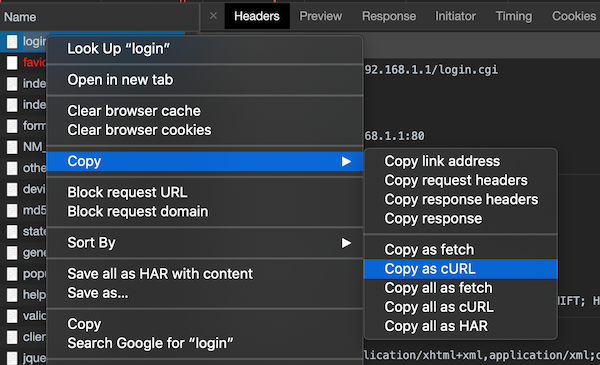
Copy this to a text editor for future use. Indicate that this is the login cURL code.
The resulting code will look like this. It will be one continuous string but to make this easier to read, I added a few line returns.
curl 'http://192.168.1.1/login.cgi'
-H 'Connection: keep-alive'
-H 'Cache-Control: max-age=0'
-H 'Origin: http://192.168.1.1'
-H 'Upgrade-Insecure-Requests: 1'
-H 'Content-Type: application/x-www-form-urlencoded'
-H 'User-Agent: Mozilla/5.0 (Macintosh; Intel Mac OS X 10_15_3) AppleWebKit/537.36 (KHTML, like Gecko) Chrome/80.0.3987.132 Safari/537.36'
-H 'Accept: text/html,application/xhtml+xml,application/xml;q=0.9,image/webp,image/apng,*/*;q=0.8,application/signed-exchange;v=b3;q=0.9'
-H 'Referer: http://192.168.1.1/Main_Login.asp'
-H 'Accept-Language: en-US,en;q=0.9'
-H 'Cookie: asus_token=aIc2IfVMYBsKWxv15f2cGWIEqmzgfEr; clickedItem_tab=0'
--data 'group_id=&action_mode=&action_script=&action_wait=5¤t_page=Main_Login.asp&next_page=index.asp&login_authorization=<removed>' --compressed --insecureThe two biggest items to note here are the asus_token and login_authorization values.
The asus_token is randomly generated upon each login. You will need to reference this later when you change the VPN setting. However, since it's unique, we will be saving it to a cookie jar.
The login_authorization value has been removed from my code for obvious reasons. This is a hash of the username/password.
How are we going to save the cookie to a cookie jar?
This is actually pretty simple, we just insert a '-c /tmp/cookie-jar.txt' immediately after the curl command, and we remove the -H 'Cookie: asus_token=token; clickedItem_tab=0' line. so the code will now look something like this.
curl -c /tmp/cookie-jar.txt 'http://192.168.1.1/login.cgi' -H 'User-Agent: <your agent>' -H 'Accept: text/html,application/xhtml+xml,application/xml;q=0.9,image/webp,*/*;q=0.8' -H 'Accept-Language: en-US,en;q=0.5' --compressed -H 'Content-Type: application/x-www-form-urlencoded' -H 'Origin: http://192.168.1.1' -H 'Connection: keep-alive' -H 'Referer: http://192.168.1.1/Main_Login.asp' -H 'Upgrade-Insecure-Requests: 1' --data 'group_id=&action_mode=&action_script=&action_wait=5¤t_page=Main_Login.asp&next_page=&login_authorization=<removed>'Step 02: Capture the Enable VPN Setting
Within the ASUS router admin interface, navigate to VPN > IPSec VPN.
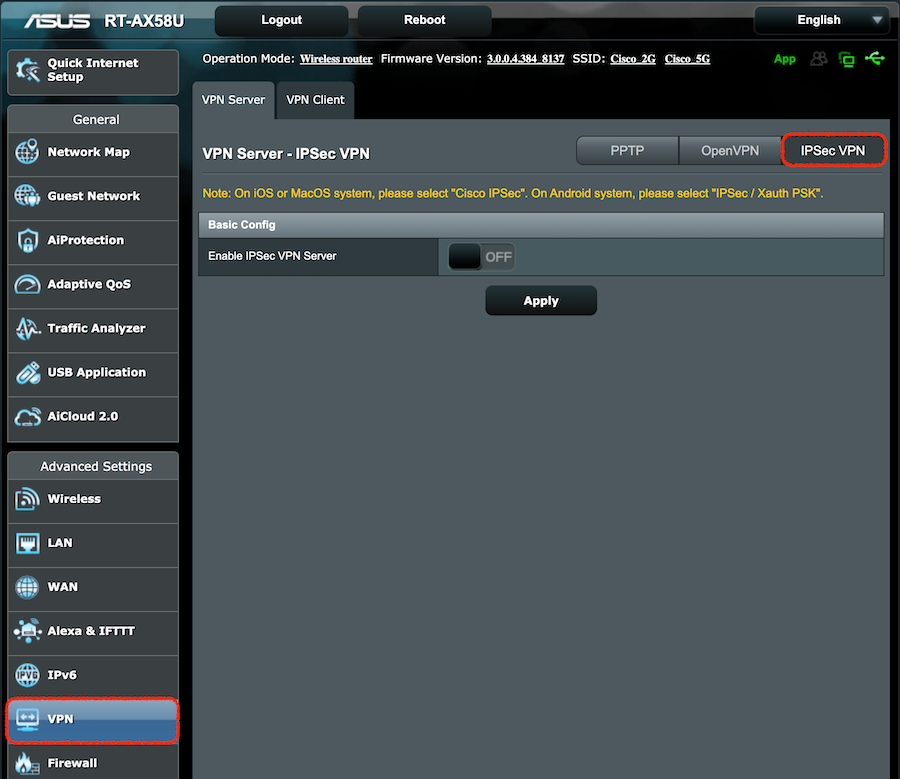
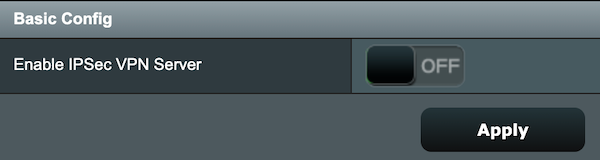
Click on the toggle to enable the VPN Server.

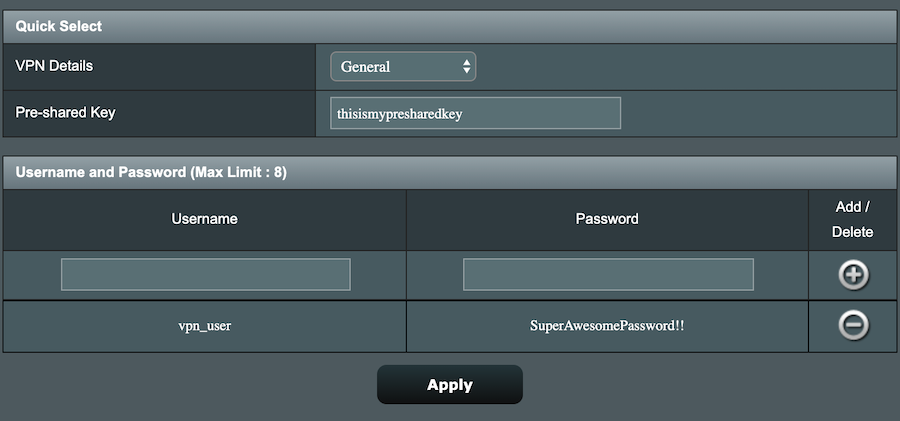
Scroll to the bottom and configure a preshared key, and define a username and password.
Note: Be sure to hit the (+) add button before hitting apply.
If everything was done correctly, the router should take a moment to apply the setting, once complete, it will take you back to the VPN settings page. If it did not, review your config and try again. Remember to add a user by clicking the plus icon.
Next, we will disable the VPN config so we can now be ready to capture the change. Disable and click Apply. Then wait for the changes to revert.
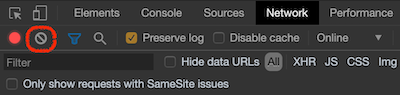
Go back into the Developer Tools view and click clear (outlined in red circle) to clear the list of objects from the Network tab.
Next, In the ASUS router interface, click Enable IPSec VPN and Apply.
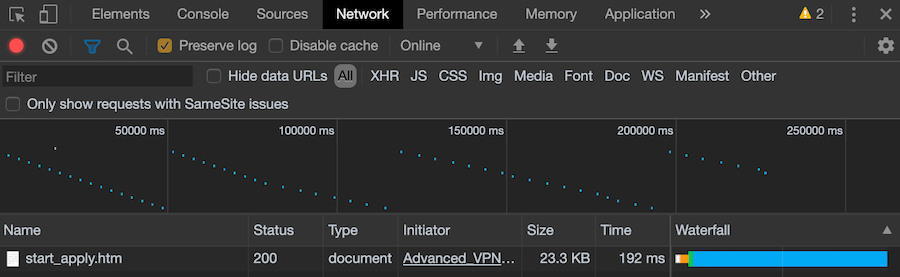
Quickly, go back to the Developer Tools view and look for a start_apply.htm object.
Right click on it and choose Copy > Copy as cURL.

Paste this into a text editor for later use. Indicate that it is the Enable VPN setting.
In you text editor:
- remove the -H 'Cookie: clickedItem_tab=0; asus_token=token'
- add -b /tmp/cookie-jar.txt
Let's highlight a few items from this block of code.
The main curl block is using a -H 'Cookie: asus_token=token' again. We will remove this and continue to reference the cookie jar. We will do that this time by using '-b /tmp/cookie-jar.txt'
The data string has all of the parameters about the VPN server in it, including the preshared key, vpn user names and passwords, and if the VPN service is enabled or disabled. Keep this safe. I am using dummy data for this example.
The parameter that controls if VPN is enabled/disabled is
ipsec_server_enable=1
1 is on, 0 if off. This is handy as when we want to disable VPN, we will just copy the same exact curl command, but set this parameter to 0.
Step 03: Capture the Disable VPN Setting
This will be identical to the Enable VPN setting cURL command, but we will flip the ipsec_server_enable to 0, so ipsec_server_enable=0.
Copy the text used from Step 02 to enable VPN, and paste it into a new area in your text editor. Then change ipsec_server_enable to ipsec_server_enable=0.
Label this section of code as Disable VPN curl command
Step 04: Capture the Logoff
Lastly, we need to capture the Logoff so we don't hold onto the session longer than needed.
Go back into the Developer Tools view and click clear (outlined in red circle) to clear the list of objects from the Network tab.
Next, In the ASUS router interface, click Logout and select yes to log off.
In the Developer Tools view, right click on Logout.asp and select Copy > Copy as cURL.
Paste this into a text editor and indicate that it is the logoff function.
In you text editor:
- remove the -H 'Cookie: clickedItem_tab=0; asus_token=token'
- add -b /tmp/cookie-jar.txt
Putting it all Together
If you have been following along at home, you should now have four commands that have been captured and modified to use a cookie jar. For a quick reference, here are all of the curl commands that you should have.
Note: The user agent field will likely differ from what you have, but luckily this makes no difference as to how the curl command will execute.
The IP address used in these examples may also differ. Use what is configured for your router.
For the login curl command, the login_authorization field has been removed in my example. Be sure to include yours for proper authentication.
For all four commands, a cookie jar is being used.
- In the first login command, we create it with '-c /tmp/cookie-jar.txt'.
- In all following commands, we reference it using '-b /tmp/cookie-jar.txt'
- For all four commands, the -H 'Cookie: clickedItem_tab=0; asus_token=token' line is removed.
curl -c /tmp/cookie-jar.txt 'http://192.168.1.1/login.cgi' -H 'Connection: keep-alive' -H 'Cache-Control: max-age=0' -H 'Origin: http://192.168.1.1' -H 'Upgrade-Insecure-Requests: 1' -H 'Content-Type: application/x-www-form-urlencoded' -H 'User-Agent: Mozilla/5.0 (Macintosh; Intel Mac OS X 10_15_3) AppleWebKit/537.36 (KHTML, like Gecko) Chrome/80.0.3987.132 Safari/537.36' -H 'Accept: text/html,application/xhtml+xml,application/xml;q=0.9,image/webp,image/apng,*/*;q=0.8,application/signed-exchange;v=b3;q=0.9' -H 'Referer: http://192.168.1.1/Main_Login.asp' -H 'Accept-Language: en-US,en;q=0.9' --data 'group_id=&action_mode=&action_script=&action_wait=5¤t_page=Main_Login.asp&next_page=&login_authorization=<auth_hash>' --compressed --insecurecurl -b /tmp/cookie-jar.txt 'http://192.168.1.1/start_apply.htm' -H 'Connection: keep-alive' -H 'Cache-Control: max-age=0' -H 'Origin: http://192.168.1.1' -H 'Upgrade-Insecure-Requests: 1' -H 'Content-Type: application/x-www-form-urlencoded' -H 'User-Agent: Mozilla/5.0 (Macintosh; Intel Mac OS X 10_15_3) AppleWebKit/537.36 (KHTML, like Gecko) Chrome/80.0.3987.132 Safari/537.36' -H 'Accept: text/html,application/xhtml+xml,application/xml;q=0.9,image/webp,image/apng,*/*;q=0.8,application/signed-exchange;v=b3;q=0.9' -H 'Referer: http://192.168.1.1/Advanced_VPN_IPSec.asp' -H 'Accept-Language: en-US,en;q=0.9' --data 'productid=RT-AX58U¤t_page=Advanced_VPN_IPSec.asp&next_page=Advanced_VPN_IPSec.asp&modified=0&action_mode=apply&action_script=ipsec_stop&action_wait=30&preferred_lang=EN&ipsec_server_enable=1&ipsec_profile_1=4%3EHost-to-Net%3Enull%3Enull%3Ewan%3E%3E1%3Ethisismypresharedkey%3Enull%3Enull%3Enull%3Enull%3Enull%3E1%3E10.10.10%3Enull%3E1%3Enull%3Enull%3E0%3Enull%3Enull%3Enull%3E1%3E%3E%3Eeap-md5%3E1%3E500%3E4500%3E10%3E1%3Enull%3Enull%3Enull%3Enull%3E%3C%3C%3C%3C%3E0&ipsec_preshared_key=thisismypresharedkey&ipsec_clients_start=10.10.10&ipsec_dns1=&ipsec_dns2=&ipsec_wins1=&ipsec_wins2=&ipsec_local_public_interface=wan&ipsec_client_list_username=&ipsec_client_list_password=&ipsec_dead_peer_detection=1&ipsec_dpd=10' --compressed --insecurecurl -b /tmp/cookie-jar.txt 'http://192.168.1.1/start_apply.htm' -H 'Connection: keep-alive' -H 'Cache-Control: max-age=0' -H 'Origin: http://192.168.1.1' -H 'Upgrade-Insecure-Requests: 1' -H 'Content-Type: application/x-www-form-urlencoded' -H 'User-Agent: Mozilla/5.0 (Macintosh; Intel Mac OS X 10_15_3) AppleWebKit/537.36 (KHTML, like Gecko) Chrome/80.0.3987.132 Safari/537.36' -H 'Accept: text/html,application/xhtml+xml,application/xml;q=0.9,image/webp,image/apng,*/*;q=0.8,application/signed-exchange;v=b3;q=0.9' -H 'Referer: http://192.168.1.1/Advanced_VPN_IPSec.asp' -H 'Accept-Language: en-US,en;q=0.9' --data 'productid=RT-AX58U¤t_page=Advanced_VPN_IPSec.asp&next_page=Advanced_VPN_IPSec.asp&modified=0&action_mode=apply&action_script=ipsec_stop&action_wait=30&preferred_lang=EN&ipsec_server_enable=0&ipsec_profile_1=4%3EHost-to-Net%3Enull%3Enull%3Ewan%3E%3E1%3Ethisismypresharedkey%3Enull%3Enull%3Enull%3Enull%3Enull%3E1%3E10.10.10%3Enull%3E1%3Enull%3Enull%3E0%3Enull%3Enull%3Enull%3E1%3E%3E%3Eeap-md5%3E1%3E500%3E4500%3E10%3E1%3Enull%3Enull%3Enull%3Enull%3E%3C%3C%3C%3C%3E0&ipsec_preshared_key=thisismypresharedkey&ipsec_clients_start=10.10.10&ipsec_dns1=&ipsec_dns2=&ipsec_wins1=&ipsec_wins2=&ipsec_local_public_interface=wan&ipsec_client_list_username=&ipsec_client_list_password=&ipsec_dead_peer_detection=1&ipsec_dpd=10' --compressed --insecurecurl -b /tmp/cookie-jar.txt 'http://192.168.1.1/Logout.asp' -H 'Connection: keep-alive' -H 'Upgrade-Insecure-Requests: 1' -H 'User-Agent: Mozilla/5.0 (Macintosh; Intel Mac OS X 10_15_3) AppleWebKit/537.36 (KHTML, like Gecko) Chrome/80.0.3987.132 Safari/537.36' -H 'Accept: text/html,application/xhtml+xml,application/xml;q=0.9,image/webp,image/apng,*/*;q=0.8,application/signed-exchange;v=b3;q=0.9' -H 'Referer: http://192.168.1.1/Advanced_VPN_IPSec.asp' -H 'Accept-Language: en-US,en;q=0.9' --compressed --insecureAll four commands have been captured and modified for use with the cookie jar file. We are now ready for Part 2.