
Editing OVF Files
William Lam has a great write-up on this topic.
https://www.virtuallyghetto.com/2013/08/flexible-ovf-deployments-using.html
This guide will expand upon this and take an even deeper look into editing OVF files.
Open The OVF File in a Text Editor
Using the OVF file that you have extracted from the OVA file (Not sure how to do this step? Learn about it here), open this up in a text editor of your choice. I will be using Atom for this guide but vi, emacs, notepad, and sublime are all great alternatives.
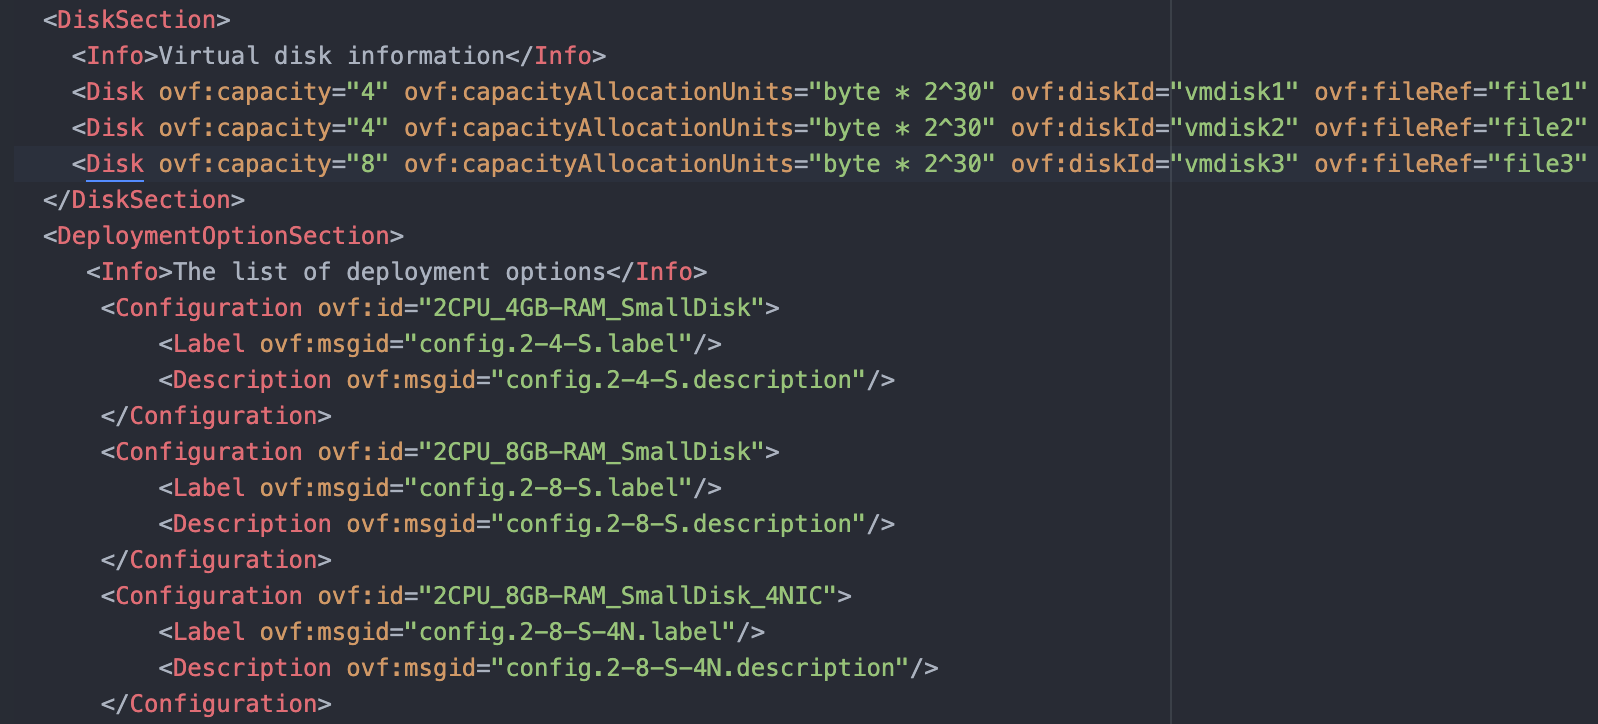
The first thing we need to do is paste in our Deployment Options section. I put this immediately following the DiskSection.
<DeploymentOptionSection>
   <Info>The list of deployment options</Info>
    <Configuration ovf:id="2CPU_4GB-RAM_SmallDisk">
        <Label ovf:msgid="config.2-4-S.label"/>
        <Description ovf:msgid="config.2-4-S.description"/>
    </Configuration>
    <Configuration ovf:id="2CPU_8GB-RAM_SmallDisk">
        <Label ovf:msgid="config.2-8-S.label"/>
        <Description ovf:msgid="config.2-8-S.description"/>
    </Configuration>
    <Configuration ovf:id="2CPU_8GB-RAM_SmallDisk_4NIC">
        <Label ovf:msgid="config.2-8-S-4N.label"/>
        <Description ovf:msgid="config.2-8-S-4N.description"/>
    </Configuration>
  </DeploymentOptionSection>
  <Strings>
   <Msg ovf:msgid="config.2-4-S.label">2x4-Small Disk</Msg>
   <Msg ovf:msgid="config.2-4-S.description">2 vCPUs and 4GB of RAM. Small Disks (8GB and 100GB).</Msg>
   <Msg ovf:msgid="config.2-8-S.label">2x8-Small Disk</Msg>
   <Msg ovf:msgid="config.2-8-S.description">2 vCPUs and 8GB of RAM. Small Disks (8GB and 100GB).</Msg>
   <Msg ovf:msgid="config.2-8-S-4N.label">2x8-Small Disk 4NIC</Msg>
   <Msg ovf:msgid="config.2-8-S-4N.description">2 vCPUs and 8GB of RAM. Small Disks (8GB and 100GB) and 4 NICs.</Msg>
  </Strings>
Deployment Options Section
This is where we define all of the deployment options we want our OVA to have. Each configuration item consists of an id, description, and label. Ensure that each id is unique. You'll want to set a unique label and description too as this is what is displayed in the GUI during deployment.
I've chosen to label these based upon the VM configuration (vCPU-RAM-DiskSize-NICs) to make identifying them across the OVF file easier.
The strings section allows us to create longer labels in a separate section of the file, keeping the main Deployment Options section cleaner. It's not required, but it keeps things tidy.
You can add more deployment options, take some away, and edit any of the ids, labels, and descriptions. Keep in mind that if you define more than 13 options, you may see some odd graphical glitches while scrolling through the options in the vCenter GUI, so if you to avoid this, keep the deployment options to a max of 13.
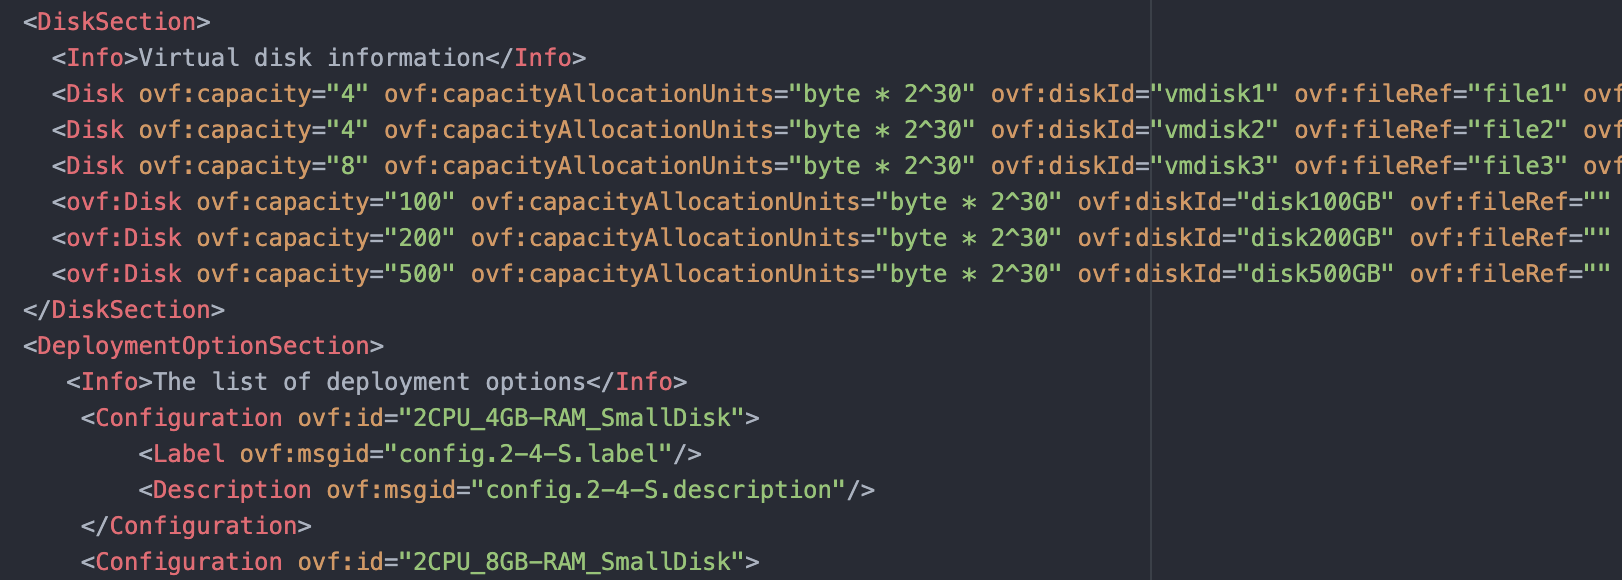
Disk Section
Here, we will define new disk options. Since the ESXi host image is already on the first VMDK, we will leave that in place and add in a few blank disk options. In order to to this, add in the following lines to the Disk Section
<ovf:Disk ovf:capacity="100" ovf:capacityAllocationUnits="byte * 2^30" ovf:diskId="disk100GB" ovf:fileRef="" ovf:format="http://www.vmware.com/interfaces/specifications/vmdk.html#streamOptimized"/>
<ovf:Disk ovf:capacity="200" ovf:capacityAllocationUnits="byte * 2^30" ovf:diskId="disk200GB" ovf:fileRef="" ovf:format="http://www.vmware.com/interfaces/specifications/vmdk.html#streamOptimized"/>
<ovf:Disk ovf:capacity="500" ovf:capacityAllocationUnits="byte * 2^30" ovf:diskId="disk500GB" ovf:fileRef="" ovf:format="http://www.vmware.com/interfaces/specifications/vmdk.html#streamOptimized"/>
Your Disk Section should now look as follows. Feel free to edit the capacity and diskID to match the size of disks you'd like to deploy.
VM Hardware
Next, we move onto the VM hardware. Each hardware component is listed in the VirtualHardwareSection right after the System lines.
vCPU
The first item in this section is usually the CPU. It is denoted by a ResourceType of 3. The element name and Description should also indicate that this is a CPU.
Replace the default CPU item with the code below.
<Item configuration="2CPU_4GB-RAM_SmallDisk">
  <rasd:AllocationUnits>hertz * 10^6</rasd:AllocationUnits>
  <rasd:Description>Number of virtual CPUs</rasd:Description>
  <rasd:ElementName>4 virtual CPUs</rasd:ElementName>
  <rasd:InstanceID>1</rasd:InstanceID>
  <rasd:ResourceType>3</rasd:ResourceType>
  <rasd:VirtualQuantity>2</rasd:VirtualQuantity>
</Item>
<Item configuration="2CPU_8GB-RAM_SmallDisk">
  <rasd:AllocationUnits>hertz * 10^6</rasd:AllocationUnits>
  <rasd:Description>Number of virtual CPUs</rasd:Description>
  <rasd:ElementName>4 virtual CPUs</rasd:ElementName>
  <rasd:InstanceID>1</rasd:InstanceID>
  <rasd:ResourceType>3</rasd:ResourceType>
  <rasd:VirtualQuantity>2</rasd:VirtualQuantity>
</Item>
<Item configuration="2CPU_8GB-RAM_SmallDisk_4NIC">
  <rasd:AllocationUnits>hertz * 10^6</rasd:AllocationUnits>
  <rasd:Description>Number of virtual CPUs</rasd:Description>
  <rasd:ElementName>4 virtual CPUs</rasd:ElementName>
  <rasd:InstanceID>1</rasd:InstanceID>
  <rasd:ResourceType>3</rasd:ResourceType>
  <rasd:VirtualQuantity>2</rasd:VirtualQuantity>
</Item>Notice how each item has a configuration value. This tells vCenter/ESXi to only configure this VM hardware for the deployment option matching that string. This needs to be set to a matching configuration ovf:id defined in the deployment options section.
To edit the number of vCPUs, change the VirtualQuantity to a valid positive integer.
RAM
The hardware type that usually follows vCPUs is RAM. This is denoted by a ResourceType of 4.
Paste in the following code and replace the exisiting RAM item.
<Item configuration="2CPU_4GB-RAM_SmallDisk">
  <rasd:AllocationUnits>byte * 2^30</rasd:AllocationUnits>
  <rasd:Description>Memory Size</rasd:Description>
  <rasd:ElementName>4GB of memory</rasd:ElementName>
  <rasd:InstanceID>2</rasd:InstanceID>
  <rasd:ResourceType>4</rasd:ResourceType>
  <rasd:VirtualQuantity>4</rasd:VirtualQuantity>
</Item>
<Item configuration="2CPU_8GB-RAM_SmallDisk">
  <rasd:AllocationUnits>byte * 2^30</rasd:AllocationUnits>
  <rasd:Description>Memory Size</rasd:Description>
  <rasd:ElementName>8GB of memory</rasd:ElementName>
  <rasd:InstanceID>2</rasd:InstanceID>
  <rasd:ResourceType>4</rasd:ResourceType>
  <rasd:VirtualQuantity>8</rasd:VirtualQuantity>
</Item>
<Item configuration="2CPU_8GB-RAM_SmallDisk_4NIC">
  <rasd:AllocationUnits>byte * 2^30</rasd:AllocationUnits>
  <rasd:Description>Memory Size</rasd:Description>
  <rasd:ElementName>8GB of memory</rasd:ElementName>
  <rasd:InstanceID>2</rasd:InstanceID>
  <rasd:ResourceType>4</rasd:ResourceType>
  <rasd:VirtualQuantity>8</rasd:VirtualQuantity>
</Item>
As is the case with the vCPUs, you can change the amount of RAM assigned to that deployment option by changing the value of VirtualQuantity to a valid positive integer.
Your VM hardware section should now look similar to the following
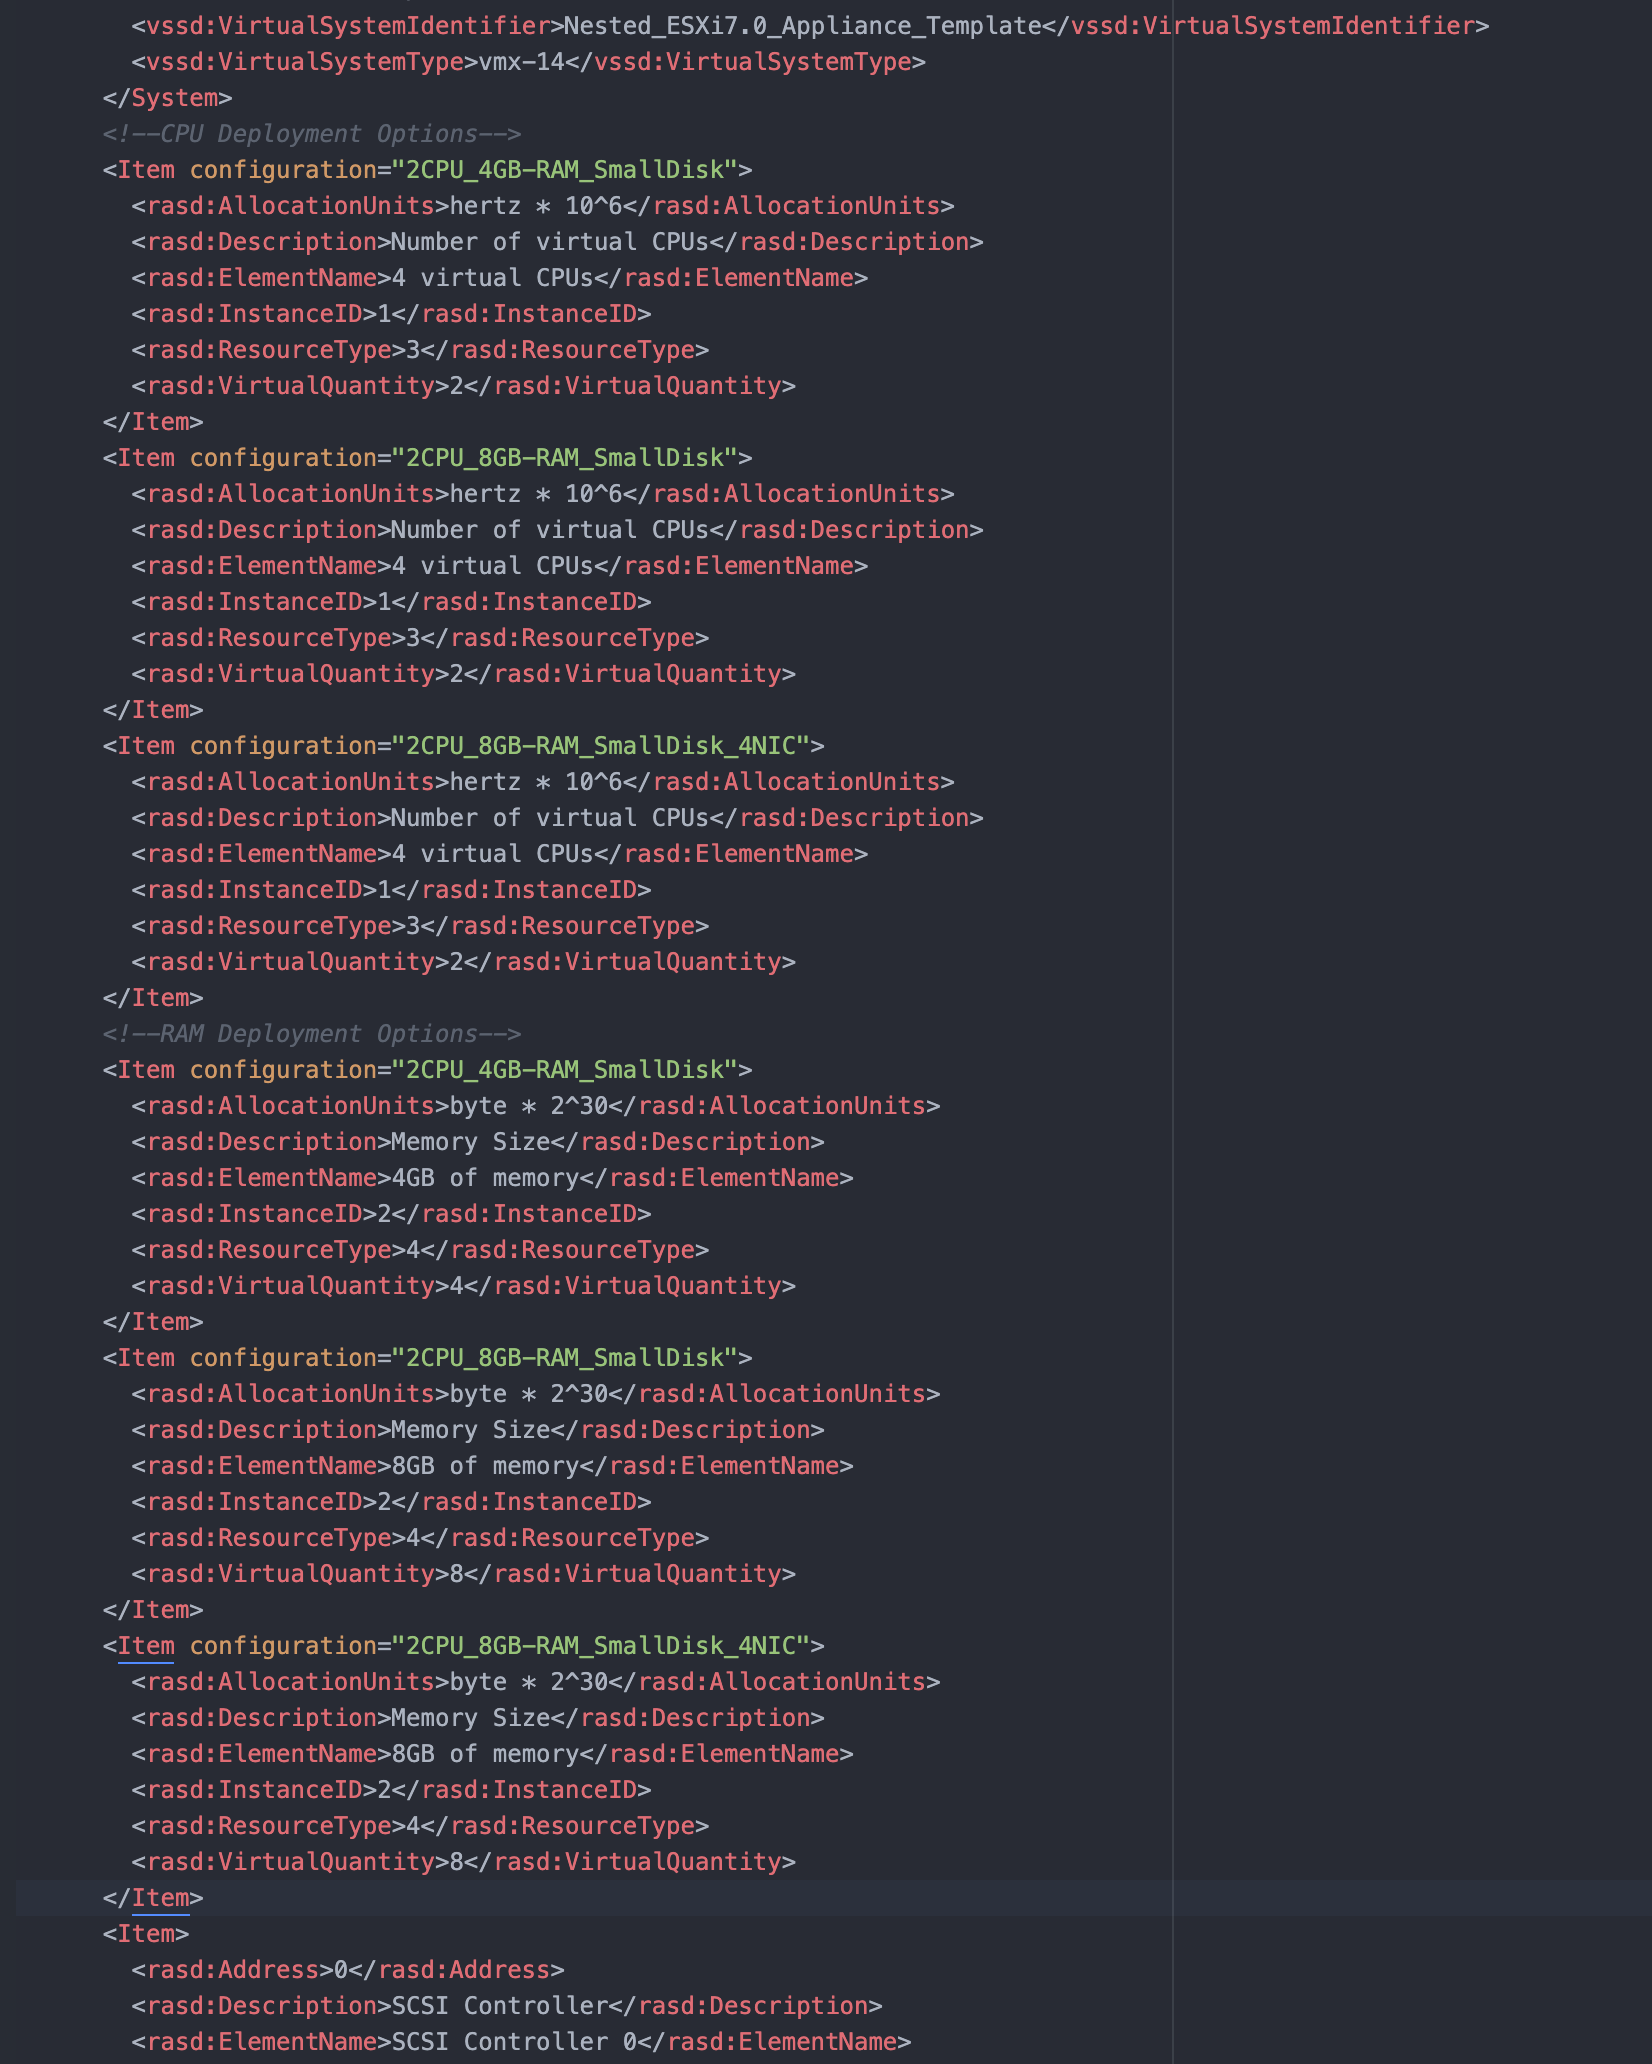
Tip: You may notice that I've added in comments above the vCPU and RAM sections. Since this file is ultimately an XML document, you can add comments using the XML syntax for comments with <!--Your Comment-->
VM Disks
The next section to configure for VM hardware is the list of VM Disks.
Locate the VM disks section ResourceType of 17.
Replace the ovf:/disk/vmdisk2 and ovf:/disk/vmdisk3 Disks with the following code.
<!--Second Disk-->
<Item configuration="2CPU_4GB-RAM_SmallDisk">
  <rasd:AddressOnParent>1</rasd:AddressOnParent>
  <rasd:ElementName>Hard Disk 2</rasd:ElementName>
  <rasd:HostResource>ovf:/disk/vmdisk2</rasd:HostResource>
  <rasd:InstanceID>10</rasd:InstanceID>
  <rasd:Parent>3</rasd:Parent>
  <rasd:ResourceType>17</rasd:ResourceType>
  <vmw:Config ovf:required="false" vmw:key="backing.writeThrough" vmw:value="false"/>
</Item>
<Item configuration="2CPU_8GB-RAM_SmallDisk">
  <rasd:AddressOnParent>1</rasd:AddressOnParent>
  <rasd:ElementName>Hard Disk 2</rasd:ElementName>
  <rasd:HostResource>ovf:/disk/vmdisk2</rasd:HostResource>
  <rasd:InstanceID>10</rasd:InstanceID>
  <rasd:Parent>3</rasd:Parent>
  <rasd:ResourceType>17</rasd:ResourceType>
  <vmw:Config ovf:required="false" vmw:key="backing.writeThrough" vmw:value="false"/>
</Item>
<Item configuration="2CPU_8GB-RAM_SmallDisk_4NIC">
  <rasd:AddressOnParent>1</rasd:AddressOnParent>
  <rasd:ElementName>Hard Disk 2</rasd:ElementName>
  <rasd:HostResource>ovf:/disk/vmdisk2</rasd:HostResource>
  <rasd:InstanceID>10</rasd:InstanceID>
  <rasd:Parent>3</rasd:Parent>
  <rasd:ResourceType>17</rasd:ResourceType>
  <vmw:Config ovf:required="false" vmw:key="backing.writeThrough" vmw:value="false"/>
</Item>
<!--Third Disk-->
<Item configuration="2CPU_4GB-RAM_SmallDisk">
  <rasd:AddressOnParent>2</rasd:AddressOnParent>
  <rasd:ElementName>Hard Disk 3</rasd:ElementName>
  <rasd:HostResource>ovf:/disk/disk100GB</rasd:HostResource>
  <rasd:InstanceID>11</rasd:InstanceID>
  <rasd:Parent>3</rasd:Parent>
  <rasd:ResourceType>17</rasd:ResourceType>
  <vmw:Config ovf:required="false" vmw:key="backing.writeThrough" vmw:value="false"/>
</Item>
<Item configuration="2CPU_8GB-RAM_SmallDisk">
  <rasd:AddressOnParent>2</rasd:AddressOnParent>
  <rasd:ElementName>Hard Disk 3</rasd:ElementName>
  <rasd:HostResource>ovf:/disk/disk100GB</rasd:HostResource>
  <rasd:InstanceID>11</rasd:InstanceID>
  <rasd:Parent>3</rasd:Parent>
  <rasd:ResourceType>17</rasd:ResourceType>
  <vmw:Config ovf:required="false" vmw:key="backing.writeThrough" vmw:value="false"/>
</Item>
<Item configuration="2CPU_8GB-RAM_SmallDisk_4NIC">
  <rasd:AddressOnParent>2</rasd:AddressOnParent>
  <rasd:ElementName>Hard Disk 3</rasd:ElementName>
  <rasd:HostResource>ovf:/disk/disk100GB</rasd:HostResource>
  <rasd:InstanceID>11</rasd:InstanceID>
  <rasd:Parent>3</rasd:Parent>
  <rasd:ResourceType>17</rasd:ResourceType>
  <vmw:Config ovf:required="false" vmw:key="backing.writeThrough" vmw:value="false"/>
</Item>
Notes regarding the VM Disks
AddressOnParent needs to be unique. The first disk containing the ESXi image is Address 0. The 2nd and 3rd disks are 1 and 2 respectively. Ensure your changes match this alignment.
The Instance ID for the first disk is 9, with the 2nd and 3rd disk being 10 and 11. Ensure any changes you make honor this alignment to avoid conflicts.
You define which disk size is referenced in the HostResouce parameter. This calls back to the id of the disk defined in the disk section earlier.
Network Device
The last VM hardware piece we need to define are the network devices. By default, two will exist. Since I wanted all nested ESXi hosts to have at least 2 vNICs, and up to four, I left the two default items in place and added code to check for 4 NIC deployment options and added two additional NICs only when the 4NIC deployment options were selected.
Here is the code you want to add below the existing to NICs to allow for this.
<Item configuration="2CPU_8GB-RAM_SmallDisk_4NIC">
<rasd:AddressOnParent>9</rasd:AddressOnParent>
<rasd:AutomaticAllocation>true</rasd:AutomaticAllocation>
<rasd:Connection>VM Network</rasd:Connection>
<rasd:Description>VmxNet3 ethernet adapter on "VM Network"</rasd:Description>
<rasd:ElementName>Ethernet 3</rasd:ElementName>
<rasd:InstanceID>14</rasd:InstanceID>
<rasd:ResourceSubType>VmxNet3</rasd:ResourceSubType>
<rasd:ResourceType>10</rasd:ResourceType>
<vmw:Config ovf:required="false" vmw:key="wakeOnLanEnabled" vmw:value="false"/>
<vmw:Config ovf:required="false" vmw:key="connectable.allowGuestControl" vmw:value="true"/>
</Item>
<Item configuration="2CPU_8GB-RAM_SmallDisk_4NIC">
<rasd:AddressOnParent>10</rasd:AddressOnParent>
<rasd:AutomaticAllocation>true</rasd:AutomaticAllocation>
<rasd:Connection>VM Network</rasd:Connection>
<rasd:Description>VmxNet3 ethernet adapter on "VM Network"</rasd:Description>
<rasd:ElementName>Ethernet 4</rasd:ElementName>
<rasd:InstanceID>15</rasd:InstanceID>
<rasd:ResourceSubType>VmxNet3</rasd:ResourceSubType>
<rasd:ResourceType>10</rasd:ResourceType>
<vmw:Config ovf:required="false" vmw:key="wakeOnLanEnabled" vmw:value="false"/>
<vmw:Config ovf:required="false" vmw:key="connectable.allowGuestControl" vmw:value="true"/>
</Item>In this example, only one deployment option is configured to use 4 NICs. If you add more deployment options that have 4 NICs, you will need to add items for all of these additional deployment options. Copy the code above for each additional deployment option with 4 NICs and change the item configuration to the id of that deployment option.
Wrapping Things Up
And with that, you are done. Make sure to package this back into an OVA file by following the guide I created over here.
If you want to explore OVF file format specification, you can view it in all of it's glory on DMTF.org.
https://www.dmtf.org/sites/default/files/standards/documents/DSP0243_2.1.1.pdf